6 KiB
| type | disqus_identifier |
|---|---|
| reference, howto | https://docs.gitlab.com/ee/administration/custom_hooks.html |
Server hooks (CORE ONLY)
Notes:
- Server hooks were introduced in GitLab 12.8 replacing Custom Hooks.
- Server hooks must be configured on the filesystem of the GitLab server. Only GitLab server administrators will be able to complete these tasks. Please explore webhooks and GitLab CI/CD as an option if you do not have filesystem access. For a user-configurable Git hook interface, see Push Rules, available in GitLab Starter (STARTER).
- Server hooks won't be replicated to secondary nodes if you use GitLab Geo.
Git natively supports hooks that are executed on different actions. Examples of server-side Git hooks include pre-receive, post-receive, and update. See Git SCM Server-Side Hooks for more information about each hook type.
As of GitLab Shell version 2.2.0 (which requires GitLab 7.5+), GitLab administrators can add custom Git hooks to any GitLab project.
Create a server hook for a repository
Server-side Git hooks are typically placed in the repository's hooks
subdirectory. In GitLab, hook directories are symlinked to the GitLab Shell
hooks directory for ease of maintenance between GitLab Shell upgrades.
Server hooks are implemented differently, but the behavior is exactly the same
once the hook is created. Follow the steps below to set up a server hook for a
repository:
- Pick a project that needs a server hook.
- On the GitLab server, navigate to the project's repository directory.
For an installation from source the path is usually
/home/git/repositories/<group>/<project>.git. For Omnibus installs the path is usually/var/opt/gitlab/git-data/repositories/<group>/<project>.git. - Create a new directory in this location called
custom_hooks. - Inside the new
custom_hooksdirectory, create a file with a name matching the hook type. For a pre-receive hook the file name should bepre-receivewith no extension. - Make the hook file executable and make sure it's owned by Git.
- Write the code to make the server hook function as expected. Hooks can be
in any language. Ensure the 'shebang' at the top properly reflects the language
type. For example, if the script is in Ruby the shebang will probably be
#!/usr/bin/env ruby.
That's it! Assuming the hook code is properly implemented the hook will fire as appropriate.
Set a global server hook for all repositories
To create a Git hook that applies to all of your repositories in
your instance, set a global server hook. Since GitLab will look inside the GitLab Shell
hooks directory for global hooks, adding any hook there will apply it to all repositories.
Follow the steps below to properly set up a server hook for all repositories:
- On the GitLab server, navigate to the configured custom hook directory. The
default is in the GitLab Shell directory. The GitLab Shell
hookdirectory for an installation from source the path is usually/home/git/gitlab-shell/hooks. For Omnibus installs the path is usually/opt/gitlab/embedded/service/gitlab-shell/hooks. To look in a different directory for the global custom hooks, setcustom_hooks_dirin the GitLab Shell config. For Omnibus installations, this can be set ingitlab.rb; and in source installations, this can be set ingitlab-shell/config.yml. - Create a new directory in this location. Depending on your hook, it will be
either a
pre-receive.d,post-receive.d, orupdate.ddirectory. - Inside this new directory, add your hook. Hooks can be
in any language. Ensure the 'shebang' at the top properly reflects the language
type. For example, if the script is in Ruby the shebang will probably be
#!/usr/bin/env ruby. - Make the hook file executable and make sure it's owned by Git.
Now test the hook to check whether it is functioning properly.
Chained hooks support
Introduced in GitLab Shell 4.1.0 and GitLab 8.15.
Hooks can be also global or be set per project directories and support a chained execution of the hooks.
NOTE: Note:
<hook_name>.d would need to be either pre-receive.d,
post-receive.d, or update.d to work properly. Any other names will be ignored.
NOTE: Note:
Files in .d directories need to be executable and not match the backup file
pattern (*~).
The hooks are searched and executed in this order:
- Built-in GitLab server hooks (not user-customizable).
<project>.git/custom_hooks/<hook_name>- per-project hook (this was kept as the already existing behavior).<project>.git/custom_hooks/<hook_name>.d/*- per-project hooks.<custom_hooks_dir>/<hook_name>.d/*- global hooks: all executable files (except editor backup files).
The hooks of the same type are executed in order and execution stops on the first script exiting with a non-zero value.
For <project>.git you'll need to
translate your project name into the hashed storage format
that GitLab uses.
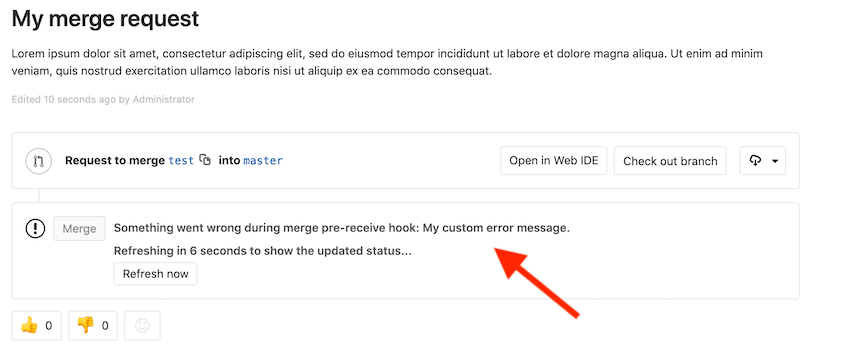
Custom error messages
Introduced in GitLab 8.10.
To have custom error messages appear in GitLab's UI when the commit is declined or an error occurs during the Git hook, your script should:
- Send the custom error messages to either the script's
stdoutorstderr. - Prefix each message with
GL-HOOK-ERR:with no characters appearing before the prefix.
Example custom error message
This hook script written in bash will generate the following message in GitLab's UI:
#!/bin/sh
echo "GL-HOOK-ERR: My custom error message.";
exit 1