5.4 KiB
Okta SSO provider
Okta is a Single Sign-on provider that can be used to authenticate with GitLab.
The following documentation enables Okta as a SAML provider.
Configure the Okta application
-
On Okta go to the admin section and choose to Add an App.
-
When the app screen comes up you see another button to Create an App and choose SAML 2.0 on the next screen.
-
Now, very important, add a logo (you can choose it from https://about.gitlab.com/press/). You'll have to crop and resize it.
-
Next, you'll need the to fill in the SAML general config. Here's an example image.
-
The last part of the configuration is the feedback section where you can just say you're a customer and creating an app for internal use.
-
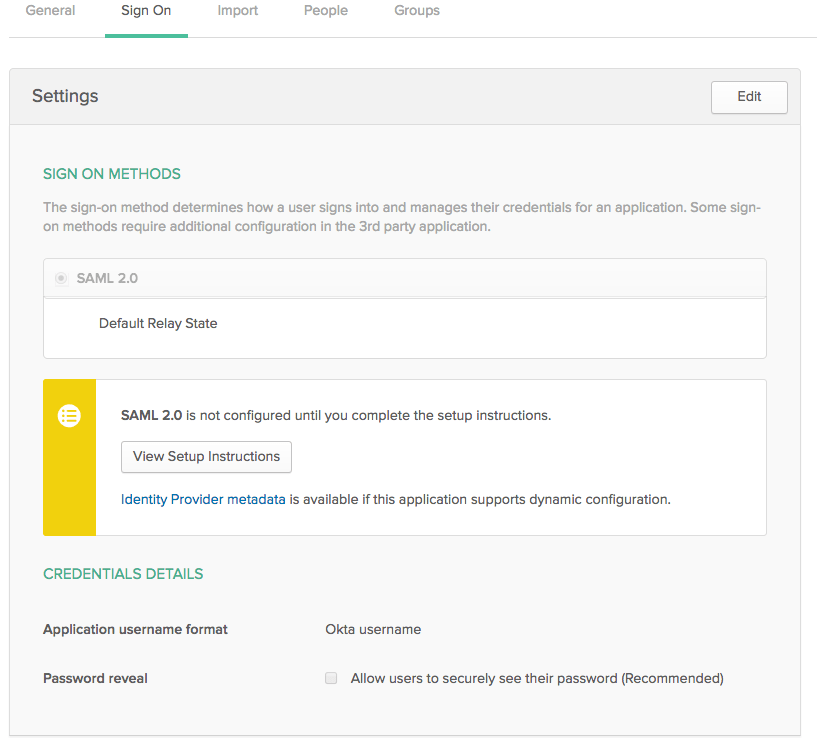
When you have your app you'll have a few tabs on the top of the app's profile. Click on the SAML 2.0 config instructions button which should look like the following:
-
On the screen that comes up take note of the Identity Provider Single Sign-On URL which you'll use for the
idp_sso_target_urlon your GitLab config file. -
Before you leave Okta make sure you add your user and groups if any.
Now that the Okta app is configured, it's time to enable it in GitLab.
Configure GitLab
-
On your GitLab server, open the configuration file:
For Omnibus GitLab installations
sudo editor /etc/gitlab/gitlab.rbFor installations from source
cd /home/git/gitlab sudo -u git -H editor config/gitlab.yml -
See Initial OmniAuth Configuration for initial settings.
-
To allow your users to use Okta to sign up without having to manually create an account first, don't forget to add the following values to your configuration:
For Omnibus GitLab installations
gitlab_rails['omniauth_allow_single_sign_on'] = ['saml']
gitlab_rails['omniauth_block_auto_created_users'] = false
For installations from source
allow_single_sign_on: ["saml"] block_auto_created_users: false -
You can also automatically link Okta users with existing GitLab users if their email addresses match by adding the following setting:
For Omnibus GitLab installations
gitlab_rails['omniauth_auto_link_saml_user'] = trueFor installations from source
auto_link_saml_user: true -
Add the provider configuration.
Notes:
- Change the value for
assertion_consumer_service_urlto match the HTTPS endpoint of GitLab (appendusers/auth/saml/callbackto the HTTPS URL of your GitLab installation to generate the correct value). - To get the
idp_cert_fingerprintfingerprint, first download the certificate from the Okta app you registered and then run:openssl x509 -in okta.cert -noout -fingerprint. Substituteokta.certwith the location of your certificate. - Change the value of
idp_sso_target_url, with the value of the Identity Provider Single Sign-On URL from the step when you configured the Okta app. - Change the value of
issuerto a unique name, which will identify the application to the IdP. - Leave
name_identifier_formatas-is.
For Omnibus GitLab installations
gitlab_rails['omniauth_providers'] = [
  {
    name: 'saml',
    args: {
             assertion_consumer_service_url: 'https://gitlab.example.com/users/auth/saml/callback',
             idp_cert_fingerprint: '43:51:43:a1:b5:fc:8b:b7:0a:3a:a9:b1:0f:66:73:a8',
             idp_sso_target_url: 'https://gitlab.oktapreview.com/app/gitlabdev773716_gitlabsaml_1/exk8odl81tBrjpD4B0h7/sso/saml',
             issuer: 'https://gitlab.example.com',
             name_identifier_format: 'urn:oasis:names:tc:SAML:2.0:nameid-format:transient'
           },
    label: 'Okta' # optional label for SAML login button, defaults to "Saml"
  }
]
For installations from source
- { name: 'saml', args: { assertion_consumer_service_url: 'https://gitlab.example.com/users/auth/saml/callback', idp_cert_fingerprint: '43:51:43:a1:b5:fc:8b:b7:0a:3a:a9:b1:0f:66:73:a8', idp_sso_target_url: 'https://gitlab.oktapreview.com/app/gitlabdev773716_gitlabsaml_1/exk8odl81tBrjpD4B0h7/sso/saml', issuer: 'https://gitlab.example.com', name_identifier_format: 'urn:oasis:names:tc:SAML:2.0:nameid-format:transient' }, label: 'Okta' # optional label for SAML login button, defaults to "Saml" } - Change the value for
-
Reconfigure or restart GitLab for Omnibus and installations from source respectively for the changes to take effect.
You might want to try this out on an incognito browser window.
Configuring groups
Note: Make sure the groups exist and are assigned to the Okta app.
You can take a look of the SAML documentation on external groups since it works the same.

