13 KiB
Vue
To get started with Vue, read through their documentation.
Vue architecture
All new features built with Vue.js must follow a Flux architecture. The main goal we are trying to achieve is to have only one data flow and only one data entry. In order to achieve this goal, you can either use vuex or use the store pattern, explained below:
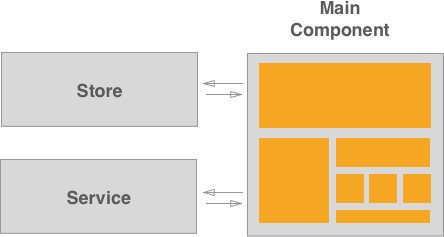
Each Vue bundle needs a Store - where we keep all the data -,a Service - that we use to communicate with the server - and a main Vue component.
Think of the Main Vue Component as the entry point of your application. This is the only smart component that should exist in each Vue feature. This component is responsible for:
- Calling the Service to get data from the server
- Calling the Store to store the data received
- Mounting all the other components
You can also read about this architecture in vue docs about state management and about one way data flow.
Components, Stores and Services
In some features implemented with Vue.js, like the issue board or environments table you can find a clear separation of concerns:
new_feature
├── components
│   └── component.vue
│   └── ...
├── stores
│  └── new_feature_store.js
├── services # only when not using vuex
│  └── new_feature_service.js
├── index.js
For consistency purposes, we recommend you to follow the same structure.
Let's look into each of them:
A index.js file
This is the index file of your new feature. This is where the root Vue instance of the new feature should be.
The Store and the Service should be imported and initialized in this file and provided as a prop to the main component.
Don't forget to follow these steps.
Bootstrapping Gotchas
Providing data from Haml to JavaScript
While mounting a Vue application may be a need to provide data from Rails to JavaScript.
To do that, provide the data through data attributes in the HTML element and query them while mounting the application.
Note: You should only do this while initing the application, because the mounted element will be replaced with Vue-generated DOM.
The advantage of providing data from the DOM to the Vue instance through props in the render function
instead of querying the DOM inside the main vue component is that makes tests easier by avoiding the need to
create a fixture or an HTML element in the unit test. See the following example:
// haml
.js-vue-app{ data: { endpoint: 'foo' }}

document.addEventListener('DOMContentLoaded', () => new Vue({
  el: '.js-vue-app',
  data() {
    const dataset = this.$options.el.dataset;
    return {
      endpoint: dataset.endpoint,
    };
  },
  render(createElement) {
    return createElement('my-component', {
      props: {
        endpoint: this.isLoading,
      },
    });
  },
}));
Accessing the gl object
When we need to query the gl object for data that won't change during the application's lyfecyle, we should do it in the same place where we query the DOM.
By following this practice, we can avoid the need to mock the gl object, which will make tests easier.
It should be done while initializing our Vue instance, and the data should be provided as props to the main component:
example:
document.addEventListener('DOMContentLoaded', () => new Vue({
  el: '.js-vue-app',
  render(createElement) {
    return createElement('my-component', {
      props: {
        username: gon.current_username,
      },
    });
  },
}));
A folder for Components
This folder holds all components that are specific of this new feature.
If you need to use or create a component that will probably be used somewhere
else, please refer to vue_shared/components.
A good thumb rule to know when you should create a component is to think if it will be reusable elsewhere.
For example, tables are used in a quite amount of places across GitLab, a table would be a good fit for a component. On the other hand, a table cell used only in one table would not be a good use of this pattern.
You can read more about components in Vue.js site, Component System
Components Gotchas
- Using SVGs icons in components: To use an SVG icon in a template use the
icon.vue - Using SVGs illustrations in components: To use an SVG illustrations in a template provide the path as a prop.
A folder for the Store
Vuex
Check this page for more details.
Flux like state management
The Store is a class that allows us to manage the state in a single source of truth. It is not aware of the service or the components.
The concept we are trying to follow is better explained by Vue documentation itself, please read this guide: State Management
A folder for the Service
If you are using Vuex you won't need this step
The Service is a class used only to communicate with the server. It does not store or manipulate any data. It is not aware of the store or the components. We use axios to communicate with the server. Refer to axios for more details.
Axios instance should only be imported in the service file.
import axios from 'javascripts/lib/utils/axios_utils';
End Result
The following example shows an application:
// store.js
export default class Store {

  /**
   * This is where we will iniatialize the state of our data.
   * Usually in a small SPA you don't need any options when starting the store. In the case you do
   * need guarantee it's an Object and it's documented.
   *
   * @param  {Object} options
   */
  constructor(options) {
    this.options = options;

    // Create a state object to handle all our data in the same place
    this.todos = []:
  }

  setTodos(todos = []) {
    this.todos = todos;
  }

  addTodo(todo) {
    this.todos.push(todo);
  }

  removeTodo(todoID) {
    const state = this.todos;

    const newState = state.filter((element) => {element.id !== todoID});

    this.todos = newState;
  }
}

// service.js
import axios from 'javascripts/lib/utils/axios_utils'

export default class Service {
  constructor(options) {
    this.todos = axios.create({
      baseURL: endpoint.todosEndpoint
    });

  }

  getTodos() {
    return this.todos.get();
  }

  addTodo(todo) {
    return this.todos.put(todo);
  }
}
// todo_component.vue
<script>
export default {
  props: {
    data: {
      type: Object,
      required: true,
    },
  }
}
</script>
<template>
  <div>
    <h1>
      Title: {{data.title}}
    </h1>
    <p>
      {{data.text}}
    </p>
  </div>
</template>

// todos_main_component.vue
<script>
import Store from 'store';
import Service from 'service';
import TodoComponent from 'todoComponent';
export default {
  components: {
    todo: TodoComponent,
  },
  /**
   * Although most data belongs in the store, each component it's own state.
   * We want to show a loading spinner while we are fetching the todos, this state belong
   * in the component.
   *
   * We need to access the store methods through all methods of our component.
   * We need to access the state of our store.
   */
  data() {
    const store = new Store();

    return {
      isLoading: false,
      store: store,
      todos: store.todos,
    };
  },

  created() {
    this.service = new Service('todos');

    this.getTodos();
  },

  methods: {
    getTodos() {
      this.isLoading = true;

      this.service.getTodos()
        .then(response => response.json())
        .then((response) => {
          this.store.setTodos(response);
          this.isLoading = false;
        })
        .catch(() => {
          this.isLoading = false;
          // Show an error
        });
    },

    addTodo(todo) {
      this.service.addTodo(todo)
      then(response => response.json())
      .then((response) => {
        this.store.addTodo(response);
      })
      .catch(() => {
        // Show an error
      });
    }
  }
}
</script>
<template>
  <div class="container">
    <div v-if="isLoading">
      <i
        class="fa fa-spin fa-spinner"
        aria-hidden="true" />
    </div>

    <div
      v-if="!isLoading"
      class="js-todo-list">
      <template v-for='todo in todos'>
        <todo :data="todo" />
      </template>

      <button
        @click="addTodo"
        class="js-add-todo">
        Add Todo
      </button>
    </div>
  <div>
</template>

// bundle.js
import todoComponent from 'todos_main_component.vue';

new Vue({
  el: '.js-todo-app',
  components: {
    todoComponent,
  },
  render: createElement => createElement('todo-component' {
    props: {
      someProp: [],
    }
  }),
});
The issue boards service is a good example of this pattern.
Style guide
Please refer to the Vue section of our style guide for best practices while writing your Vue components and templates.
Testing Vue Components
Each Vue component has a unique output. This output is always present in the render function.
Although we can test each method of a Vue component individually, our goal must be to test the output of the render/template function, which represents the state at all times.
Make use of Vue Resource Interceptors to mock data returned by the service.
Here's how we would test the Todo App above:
import component from 'todos_main_component';

describe('Todos App', () => {
  it('should render the loading state while the request is being made', () => {
    const Component = Vue.extend(component);

    const vm = new Component().$mount();

    expect(vm.$el.querySelector('i.fa-spin')).toBeDefined();
  });

  describe('with data', () => {
    // Mock the service to return data
    const interceptor = (request, next) => {
      next(request.respondWith(JSON.stringify([{
        title: 'This is a todo',
        body: 'This is the text'
      }]), {
        status: 200,
      }));
    };

    let vm;

    beforeEach(() => {
      Vue.http.interceptors.push(interceptor);

      const Component = Vue.extend(component);

      vm = new Component().$mount();
    });

    afterEach(() => {
      Vue.http.interceptors = _.without(Vue.http.interceptors, interceptor);
    });


    it('should render todos', (done) => {
      setTimeout(() => {
        expect(vm.$el.querySelectorAll('.js-todo-list div').length).toBe(1);
        done();
      }, 0);
    });
  });

  describe('add todo', () => {
    let vm;
    beforeEach(() => {
      const Component = Vue.extend(component);
      vm = new Component().$mount();
    });
    it('should add a todos', (done) => {
      setTimeout(() => {
        vm.$el.querySelector('.js-add-todo').click();

        // Add a new interceptor to mock the add Todo request
        Vue.nextTick(() => {
          expect(vm.$el.querySelectorAll('.js-todo-list div').length).toBe(2);
        });
      }, 0);
    });
  });
});
mountComponent helper
There is a helper in spec/javascripts/helpers/vue_mount_component_helper.js that allows you to mount a component with the given props:
import Vue from 'vue';
import mountComponent from 'helpers/vue_mount_component_helper.js'
import component from 'component.vue'

const Component = Vue.extend(component);
const data = {prop: 'foo'};
const vm = mountComponent(Component, data);
Test the component's output
The main return value of a Vue component is the rendered output. In order to test the component we need to test the rendered output. Vue guide's to unit test show us exactly that:
Stubbing API responses
Refer to mock axios