24 KiB
| stage | group | info |
|---|---|---|
| Plan | Project Management | To determine the technical writer assigned to the Stage/Group associated with this page, see https://about.gitlab.com/handbook/engineering/ux/technical-writing/#assignments |
Manage issues (FREE)
GitLab Issues are the fundamental medium for collaborating on ideas and planning work in GitLab.
Create an issue
When you create an issue, you are prompted to enter the fields of the issue. If you know the values you want to assign to an issue, you can use quick actions to enter them.
You can create an issue in many ways in GitLab:
- From a project
- From a group
- From another issue
- From an issue board
- By sending an email
- Using a URL with prefilled fields
- Using Service Desk
From a project
Prerequisites:
- You must have at least the Guest role for the project.
To create an issue:
-
On the top bar, select Menu > Projects and find your project.
-
Either:
- On the left sidebar, select Issues, and then, in the top right corner, select New issue.
- On the top bar, select the plus sign ({plus-square}) and then, under This project, select New issue.
-
Complete the fields.
-
Select Create issue.
The newly created issue opens.
From a group
Issues belong to projects, but when you're in a group, you can access and create issues that belong to the projects in the group.
Prerequisites:
- You must have at least the Guest role for a project in the group.
To create an issue from a group:
- On the top bar, select Menu > Groups and find your group.
- On the left sidebar, select Issues.
- In the top right corner, select Select project to create issue.
- Select the project you'd like to create an issue for. The button now reflects the selected project.
- Select New issue in
<project name>. - Complete the fields.
- Select Create issue.
The newly created issue opens.
The project you selected most recently becomes the default for your next visit. This can save you a lot of time and clicks, if you mostly create issues for the same project.
From another issue
New issue becoming linked to the issue of origin introduced in GitLab 14.3.
You can create a new issue from an existing one. The two issues can then be marked as related.
Prerequisites:
- You must have at least the Guest role for the project.
To create an issue from another issue:
- In an existing issue, select the vertical ellipsis ({ellipsis_v}).
- Select New issue.
- Complete the fields.
The new issue's description is prefilled with
Related to #123, where123is the ID of the issue of origin. If you keep this mention in the description, the two issues become linked. - Select Create issue.
The newly created issue opens.
From an issue board
You can create a new issue from an issue board.
Prerequisites:
- You must have at least the Guest role for the project.
To create an issue from a project issue board:
- On the top bar, select Menu > Projects and find your project.
- Select Issues > Boards.
- At the top of a board list, select New issue ({plus-square}).
- Enter the issue's title.
- Select Create issue.
To create an issue from a group issue board:
- On the top bar, select Menu > Groups and find your group.
- Select Issues > Boards.
- At the top of a board list, select New issue ({plus-square}).
- Enter the issue's title.
- Under Projects, select the project in the group that the issue should belong to.
- Select Create issue.
The issue is created and shows up in the board list. It shares the list's characteristic, so, for
example, if the list is scoped to a label Frontend, the new issue also has this label.
By sending an email
Generated email address format changed in GitLab 11.7. The older format is still supported, so existing aliases and contacts still work.
You can send an email to create an issue in a project on the project's Issues List page.
Prerequisites:
- Your GitLab instance must have incoming email configured.
- There must be at least one issue in the issue list.
- You must have at least the Guest role for the project.
To email an issue to a project:
- On the top bar, select Menu > Projects and find your project.
- Select Issues.
- At the bottom of the page, select Email a new issue to this project.
- To copy the email address, select Copy ({copy-to-clipboard}).
- From your email client, send an email to this address. The subject is used as the title of the new issue, and the email body becomes the description. You can use Markdown and quick actions.
A new issue is created, with your user as the author. You can save this address as a contact in your email client to use it again.
WARNING: The email address you see is a private email address, generated just for you. Keep it to yourself, because anyone who knows it can create issues or merge requests as if they were you.
To regenerate the email address:
- On the issues list, select Email a new issue to this project.
- Select reset this token.
Using a URL with prefilled values
To link directly to the new issue page with prefilled fields, use query string parameters in a URL. You can embed a URL in an external HTML page to create issues with certain fields prefilled.
| Field | URL parameter | Notes |
|---|---|---|
| Title | issue[title] |
Must be URL-encoded. |
| Issue type | issue[issue_type] |
Either incident or issue. |
| Description template | issuable_template |
Cannot be used at the same time as issue[description]. Must be URL-encoded. |
| Description | issue[description] |
Cannot be used at the same time as issuable_template. Must be URL-encoded. |
| Confidential | issue[confidential] |
If true, the issue is marked as confidential. |
Adapt these examples to form your new issue URL with prefilled fields. To create an issue in the GitLab project:
-
With a prefilled title and description:
https://gitlab.com/gitlab-org/gitlab/-/issues/new?issue[title]=Whoa%2C%20we%27re%20half-way%20there&issue[description]=Whoa%2C%20livin%27%20in%20a%20URL -
With a prefilled title and description template:
https://gitlab.com/gitlab-org/gitlab/-/issues/new?issue[title]=Validate%20new%20concept&issuable_template=Feature%20Proposal%20-%20basic -
With a prefilled title, description, and marked as confidential:
https://gitlab.com/gitlab-org/gitlab/-/issues/new?issue[title]=Validate%20new%20concept&issue[description]=Research%20idea&issue[confidential]=true
Using Service Desk
To offer email support, enable Service Desk for your project.
Now, when your customer sends a new email, a new issue can be created in the appropriate project and followed up from there.
Fields in the new issue form
Adding the new issue to an epic introduced in GitLab 13.1.
When you're creating a new issue, you can complete the following fields:
- Title
- Type: either issue (default) or incident
- Description template: overwrites anything in the Description text box
- Description: you can use Markdown and quick actions
- Checkbox to make the issue confidential
- Assignees
- Weight
- Epic
- Due date
- Milestone
- Labels
Edit an issue
You can edit an issue's title and description.
Prerequisites:
- You must have at least the Reporter role for a project.
To edit an issue, select Edit title and description ({pencil}).
Bulk edit issues at the project level
- Assigning epic (introduced in GitLab 13.2.
- Editing health status introduced in GitLab 13.2.
- Editing iteration introduced in GitLab 13.9.
Users with permission level of Reporter or higher can manage issues.
When bulk editing issues in a project, you can edit the following attributes:
- Status (open/closed)
- Assignee
- Epic
- Milestone
- Labels
- Health status
- Notification subscription
- Iteration
To update multiple project issues at the same time:
- In a project, go to Issues > List.
- Click Edit issues. A sidebar on the right-hand side of your screen appears with editable fields.
- Select the checkboxes next to each issue you want to edit.
- Select the appropriate fields and their values from the sidebar.
- Click Update all.
Bulk edit issues at the group level
- Introduced in GitLab 12.1.
- Assigning epic (introduced in GitLab 13.2.
- Editing health status introduced in GitLab 13.2.
- Editing iteration introduced in GitLab 13.9.
Users with permission level of Reporter or higher can manage issues.
When bulk editing issues in a group, you can edit the following attributes:
To update multiple project issues at the same time:
- In a group, go to Issues > List.
- Click Edit issues. A sidebar on the right-hand side of your screen appears with editable fields.
- Select the checkboxes next to each issue you want to edit.
- Select the appropriate fields and their values from the sidebar.
- Click Update all.
Moving issues
Moving an issue copies it to the target project, and closes it in the originating project. The original issue is not deleted. A system note, which indicates where it came from and went to, is added to both issues.
The "Move issue" button is at the bottom of the right-sidebar when viewing the issue.

Moving issues in bulk (FREE SELF)
If you have advanced technical skills you can also bulk move all the issues from one project to another in the rails console. The below script moves all issues that are not in status closed from one project to another.
To access rails console run sudo gitlab-rails console on the GitLab server and run the below
script. Please be sure to change project, admin_user, and target_project to your values.
We do also recommend creating a backup before
attempting any changes in the console.
project = Project.find_by_full_path('full path of the project where issues are moved from')
issues = project.issues
admin_user = User.find_by_username('username of admin user') # make sure user has permissions to move the issues
target_project = Project.find_by_full_path('full path of target project where issues moved to')

issues.each do |issue|
   if issue.state != "closed" && issue.moved_to.nil?
      Issues::MoveService.new(project, admin_user).execute(issue, target_project)
   else
      puts "issue with id: #{issue.id} and title: #{issue.title} was not moved"
   end
end; nil
Closing issues
When you decide that an issue is resolved, or no longer needed, you can close the issue. The issue is marked as closed but is not deleted.
To close an issue, you can do the following:
-
Select Close issue:

-
In an issue board, drag an issue card from its list into the Closed list.

Reopen a closed issue
To reopen a closed issue, select Reopen issue. A reopened issue is no different from any other open issue.
Closing issues automatically
When a commit or merge request resolves issues, the issues can be closed automatically when the commit reaches the project's default branch.
If a commit message or merge request description contains text matching a defined pattern, all issues referenced in the matched text are closed. This happens when the commit is pushed to a project's default branch, or when a commit or merge request is merged into it.
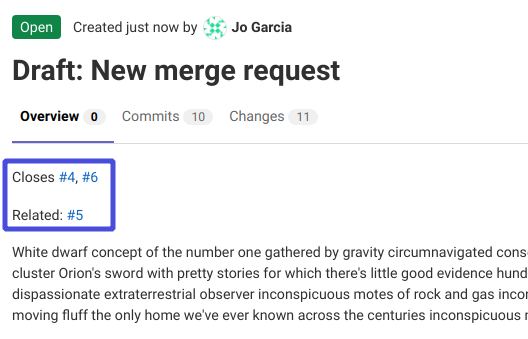
For example, if Closes #4, #6, Related to #5 is included in a Merge Request
description, issues #4 and #6 are closed automatically when the MR is merged, but not #5.
Using Related to flags #5 as a related issue,
but is not closed automatically.
If the issue is in a different repository than the MR, add the full URL for the issue(s):
Closes #4, #6, and https://gitlab.com/<username>/<projectname>/issues/<xxx>
For performance reasons, automatic issue closing is disabled for the very first push from an existing repository.
Alternatively, when you create a merge request from an issue, it inherits the issue's milestone and labels.
Default closing pattern
When not specified, this default issue closing pattern is used:
\b((?:[Cc]los(?:e[sd]?|ing)|\b[Ff]ix(?:e[sd]|ing)?|\b[Rr]esolv(?:e[sd]?|ing)|\b[Ii]mplement(?:s|ed|ing)?)(:?) +(?:(?:issues? +)?%{issue_ref}(?:(?: *,? +and +| *,? *)?)|([A-Z][A-Z0-9_]+-\d+))+)
This translates to the following keywords:
- Close, Closes, Closed, Closing, close, closes, closed, closing
- Fix, Fixes, Fixed, Fixing, fix, fixes, fixed, fixing
- Resolve, Resolves, Resolved, Resolving, resolve, resolves, resolved, resolving
- Implement, Implements, Implemented, Implementing, implement, implements, implemented, implementing
Note that %{issue_ref} is a complex regular expression defined inside the GitLab
source code that can match references to:
- A local issue (
#123). - A cross-project issue (
group/project#123). - A link to an issue (
https://gitlab.example.com/group/project/issues/123).
For example the following commit message:
Awesome commit message

Fix #20, Fixes #21 and Closes group/otherproject#22.
This commit is also related to #17 and fixes #18, #19
and https://gitlab.example.com/group/otherproject/issues/23.
closes #18, #19, #20, and #21 in the project this commit is pushed to,
as well as #22 and #23 in group/otherproject. #17 is not closed as it does
not match the pattern. It works with multi-line commit messages as well as one-liners
when used from the command line with git commit -m.
Disabling automatic issue closing
Introduced in GitLab 12.7.
The automatic issue closing feature can be disabled on a per-project basis in the project's repository settings. Referenced issues are still displayed, but are not closed automatically.
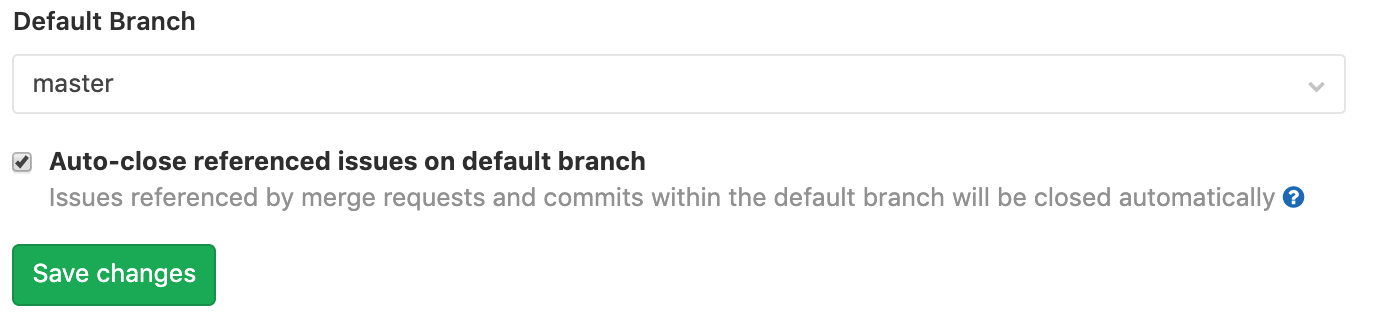
The automatic issue closing is also disabled in a project if the project has the issue tracker disabled. If you want to enable automatic issue closing, make sure to enable GitLab Issues.
This only applies to issues affected by new merge requests or commits. Already closed issues remain as-is. If issue tracking is enabled, disabling automatic issue closing only applies to merge requests attempting to automatically close issues within the same project. Merge requests in other projects can still close another project's issues.
Customizing the issue closing pattern (FREE SELF)
In order to change the default issue closing pattern, GitLab administrators must edit the
gitlab.rb or gitlab.yml file
of your installation.
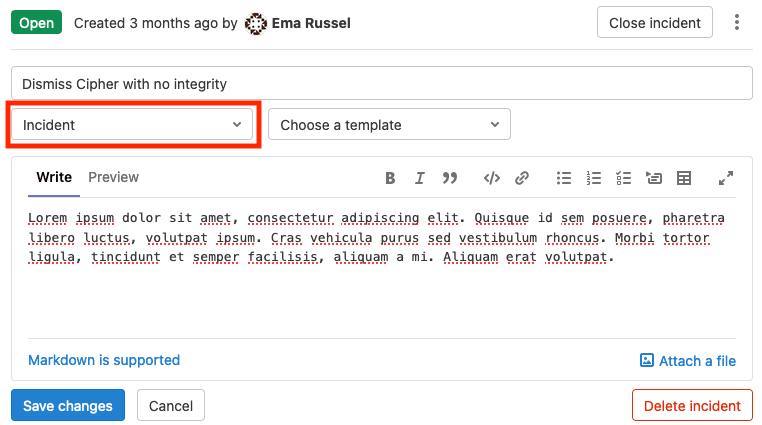
Change the issue type
Users with the Developer role can change an issue's type. To do this, edit the issue and select an issue type from the Issue type selector menu:
Delete an issue
Deleting from the vertical ellipsis menu introduced in GitLab 14.6.
Prerequisites:
- You must have the Owner role for a project.
To delete an issue:
- In an issue, select the vertical ellipsis ({ellipsis_v}).
- Select Delete issue.
Alternatively:
- In an issue, select Edit title and description ({pencil}).
- Select Delete issue.
Promote an issue to an epic (PREMIUM)
- Introduced in GitLab Ultimate 11.6.
- Moved to GitLab Premium in 12.8.
- Promoting issues to epics via the UI introduced in GitLab Premium 13.6.
You can promote an issue to an epic in the immediate parent group.
To promote an issue to an epic:
- In an issue, select the vertical ellipsis ({ellipsis_v}) button.
- Select Promote to epic.
Alternatively, you can use the /promote quick action.
Read more about promoting an issue to an epic on the Manage epics page.
Add an issue to an iteration (PREMIUM)
- Introduced in GitLab 13.2.
- Moved to GitLab Premium in 13.9.
To add an issue to an iteration:
- Go to your issue.
- On the right sidebar, in the Iteration section, select Edit.
- From the dropdown list, select the iteration to associate this issue with.
- Select any area outside the dropdown list.
You can also use the /iteration
quick action
in a comment or description field.
Copy issue reference
To refer to an issue elsewhere in GitLab, you can use its full URL or a short reference, which looks like
namespace/project-name#123, where namespace is either a group or a username.
To copy the issue reference to your clipboard:
- Go to the issue.
- On the right sidebar, next to Reference, select Copy Reference ({copy-to-clipboard}).
You can now paste the reference into another description or comment.
Read more about issue references in GitLab-Flavored Markdown.
Copy issue email address
Introduced in GitLab 13.8.
You can create a comment in an issue by sending an email.
To copy the issue's email address:
- Go to the issue.
- On the right sidebar, next to Issue email, select Copy Reference ({copy-to-clipboard}).
Sending an email to this address creates a comment containing the email body. To learn more about creating comments by sending an email and the necessary configuration, see Reply to a comment by sending email.
Real-time sidebar
- Introduced in GitLab 13.3. Disabled by default.
- Enabled on GitLab.com in GitLab 13.9.
- Enabled on self-managed in GitLab 14.5.
FLAG:
On self-managed GitLab, by default this feature is available. To hide the feature per project or for your entire instance, ask an administrator to
disable the feature flags named real_time_issue_sidebar and broadcast_issue_updates.
On GitLab.com, this feature is available.
Assignees in the sidebar are updated in real time.
Assignee
An issue can be assigned to one or more users.
The assignees can be changed as often as needed. The idea is that the assignees are people responsible for an issue. When an issue is assigned to someone, it appears in their assigned issues list.
If a user is not a member of a project, an issue can only be assigned to them if they create it themselves or another project member assigns them.
To change the assignee on an issue:
- Go to your issue.
- On the right sidebar, in the Assignee section, select Edit.
- From the dropdown list, select the user to add as an assignee.
- Select any area outside the dropdown list.
Similar issues
Introduced in GitLab 11.6.
To prevent duplication of issues for the same topic, GitLab searches for similar issues when new issues are being created.
As you type in the title field of the New Issue page, GitLab searches titles and descriptions across all issues to in the current project. Only issues you have access to are returned. Up to five similar issues, sorted by most recently updated, are displayed below the title box. GraphQL must be enabled to use this feature.

Health status (ULTIMATE)
- Introduced in GitLab Ultimate 12.10.
- Health status of closed issues can't be edited in GitLab Ultimate 13.4 and later.
- Issue health status visible in issue lists introduced in GitLab Ultimate 13.6.
- Feature flag removed in GitLab 13.7.
To help you track issue statuses, you can assign a status to each issue. This marks issues as progressing as planned or needs attention to keep on schedule:
- On track (green)
- Needs attention (amber)
- At risk (red)
After an issue is closed, its health status can't be edited and the Edit button becomes disabled until the issue is reopened.
You can then see issue statuses in the issues list and the epic tree.
Publish an issue (ULTIMATE)
Introduced in GitLab 13.1.
If a status page application is associated with the project, you can use the /publish
quick action to publish the issue.
For more information, see GitLab Status Page.