15 KiB
| stage | group | info | disqus_identifier | type |
|---|---|---|---|---|
| Verify | Pipeline Execution | To determine the technical writer assigned to the Stage/Group associated with this page, see https://about.gitlab.com/handbook/engineering/ux/technical-writing/#assignments | https://docs.gitlab.com/ee/user/project/pipelines/settings.html | reference, howto |
Customize pipeline configuration (FREE)
You can customize how pipelines run for your project.
For an overview of pipelines, watch the video GitLab CI Pipeline, Artifacts, and Environments. Watch also GitLab CI pipeline tutorial for beginners.
Change which users can view your pipelines
For public and internal projects, you can change who can see your:
- Pipelines
- Job output logs
- Job artifacts
- Pipeline security dashboard
However:
- Job output logs and artifacts are never visible for Guest users and non-project members.
To change the visibility of your pipelines and related features:
-
On the top bar, select Menu > Projects and find your project.
-
On the left sidebar, select Settings > CI/CD.
-
Expand General pipelines.
-
Select or clear the Public pipelines checkbox. When it is selected, pipelines and related features are visible:
- For public projects, to everyone.
- For internal projects, to all logged-in users except external users.
- For private projects, to all project members (Guest or higher).
When it is cleared:
- For public projects, pipelines are visible to everyone. Related features are visible only to project members (Reporter or higher).
- For internal projects, pipelines are visible to all logged in users except external users. Related features are visible only to project members (Reporter or higher).
- For private projects, pipelines and related features are visible to project members (Reporter or higher) only.
Auto-cancel redundant pipelines
You can set pending or running pipelines to cancel automatically when a new pipeline runs on the same branch. You can enable this in the project settings:
- On the top bar, select Menu > Projects and find your project.
- On the left sidebar, select Settings > CI/CD.
- Expand General Pipelines.
- Select the Auto-cancel redundant pipelines checkbox.
- Select Save changes.
Use the interruptible keyword to indicate if a
running job can be cancelled before it completes.
Skip outdated deployment jobs
Introduced in GitLab 12.9.
Your project may have multiple concurrent deployment jobs that are scheduled to run in the same time frame.
This can lead to a situation where an older deployment job runs after a newer one, which may not be what you want.
To avoid this scenario:
- On the top bar, select Menu > Projects and find your project.
- On the left sidebar, select Settings > CI/CD.
- Expand General pipelines.
- Select the Skip outdated deployment jobs checkbox.
- Select Save changes.
Older deployment job are skipped when a new deployment starts.
For more information, see Deployment safety.
Retry outdated jobs
Introduced in GitLab 13.6.
A deployment job can fail because a newer one has run. If you retry the failed deployment job, the environment could be overwritten with older source code. If you click Retry, a modal warns you about this and asks for confirmation.
For more information, see Deployment safety.
Specify a custom CI/CD configuration file
Support for external
.gitlab-ci.ymllocations introduced in GitLab 12.6.
GitLab expects to find the CI/CD configuration file (.gitlab-ci.yml) in the project's root
directory. However, you can specify an alternate filename path, including locations outside the project.
To customize the path:
- On the top bar, select Menu > Projects and find your project.
- On the left sidebar, select Settings > CI/CD.
- Expand General pipelines.
- In the CI/CD configuration file field, enter the file name, and if:
- The file is not in the root directory, include the path.
- The file is in a different project, include the group and project name.
- The file is on an external site, enter the full URL.
- Select Save changes.
Custom CI/CD configuration file examples
If the CI/CD configuration file is not in the root directory, the path must be relative to it. For example:
my/path/.gitlab-ci.ymlmy/path/.my-custom-file.yml
If the CI/CD configuration file is on an external site, the URL must end with .yml:
http://example.com/generate/ci/config.yml
If the CI/CD configuration file is in a different project in GitLab, the path must be relative to the root directory in the other project. Include the group and project name at the end:
.gitlab-ci.yml@mygroup/another-projectmy/path/.my-custom-file.yml@mygroup/another-project
If the configuration file is in a separate project, you can more set more granular permissions. For example:
- Create a public project to host the configuration file.
- Give write permissions on the project only to users who are allowed to edit the file.
Then other users and projects can access the configuration file without being able to edit it.
Choose the default Git strategy
You can choose how your repository is fetched from GitLab when a job runs.
- On the top bar, select Menu > Projects and find your project.
- On the left sidebar, select Settings > CI/CD.
- Expand General pipelines.
- Under Git strategy, select an option:
git cloneis slower because it clones the repository from scratch for every job. However, the local working copy is always pristine.git fetchis faster because it re-uses the local working copy (and falls back to clone if it doesn't exist). This is recommended, especially for large repositories.
The configured Git strategy can be overridden by the GIT_STRATEGY variable
in the .gitlab-ci.yml file.
Limit the number of changes fetched during clone
Introduced in GitLab 12.0.
You can limit the number of changes that GitLab CI/CD fetches when it clones a repository.
- On the top bar, select Menu > Projects and find your project.
- On the left sidebar, select Settings > CI/CD.
- Expand General pipelines.
- Under Git strategy, under Git shallow clone, enter a value.
The maximum value is
1000. To disable shallow clone and make GitLab CI/CD fetch all branches and tags each time, keep the value empty or set to0.
In GitLab 12.0 and later, newly created projects automatically have a default
git depth value of 50.
This value can be overridden by the GIT_DEPTH variable
in the .gitlab-ci.yml file.
Timeout
Timeout defines the maximum amount of time in minutes that a job is able run. This is configurable under your project's Settings > CI/CD > General pipelines settings. The default value is 60 minutes. Decrease the time limit if you want to impose a hard limit on your jobs' running time or increase it otherwise. In any case, if the job surpasses the threshold, it is marked as failed.
Timeout overriding for runners
Introduced in GitLab 10.7.
Project defined timeout (either specific timeout set by user or the default 60 minutes timeout) may be overridden for runners.
Test coverage parsing
If you use test coverage in your code, GitLab can capture its output in the job log using a regular expression.
In your project, go to Settings > CI/CD and expand the General pipelines section. Enter the regular expression in the Test coverage parsing field.
Leave blank if you want to disable it or enter a Ruby regular expression. You can use https://rubular.com to test your regex. The regex returns the last match found in the output.
If the pipeline succeeds, the coverage is shown in the merge request widget and in the jobs table. If multiple jobs in the pipeline have coverage reports, they are averaged.


- Simplecov (Ruby). Example:
\(\d+.\d+\%\) covered. - pytest-cov (Python). Example:
^TOTAL.+?(\d+\%)$. - Scoverage (Scala). Example:
Statement coverage[A-Za-z\.*]\s*:\s*([^%]+). phpunit --coverage-text --colors=never(PHP). Example:^\s*Lines:\s*\d+.\d+\%.- gcovr (C/C++). Example:
^TOTAL.*\s+(\d+\%)$. tap --coverage-report=text-summary(NodeJS). Example:^Statements\s*:\s*([^%]+).nyc npm test(NodeJS). Example:All files[^|]*\|[^|]*\s+([\d\.]+).- excoveralls (Elixir). Example:
\[TOTAL\]\s+(\d+\.\d+)%. mix test --cover(Elixir). Example:\d+.\d+\%\s+\|\s+Total.- JaCoCo (Java/Kotlin). Example:
Total.*?([0-9]{1,3})%. go test -cover(Go). Example:coverage: \d+.\d+% of statements.- .Net (OpenCover). Example:
(Visited Points).*\((.*)\). - .Net (
dotnet testline coverage). Example:Total\s*\|\s*(\d+(?:\.\d+)?).
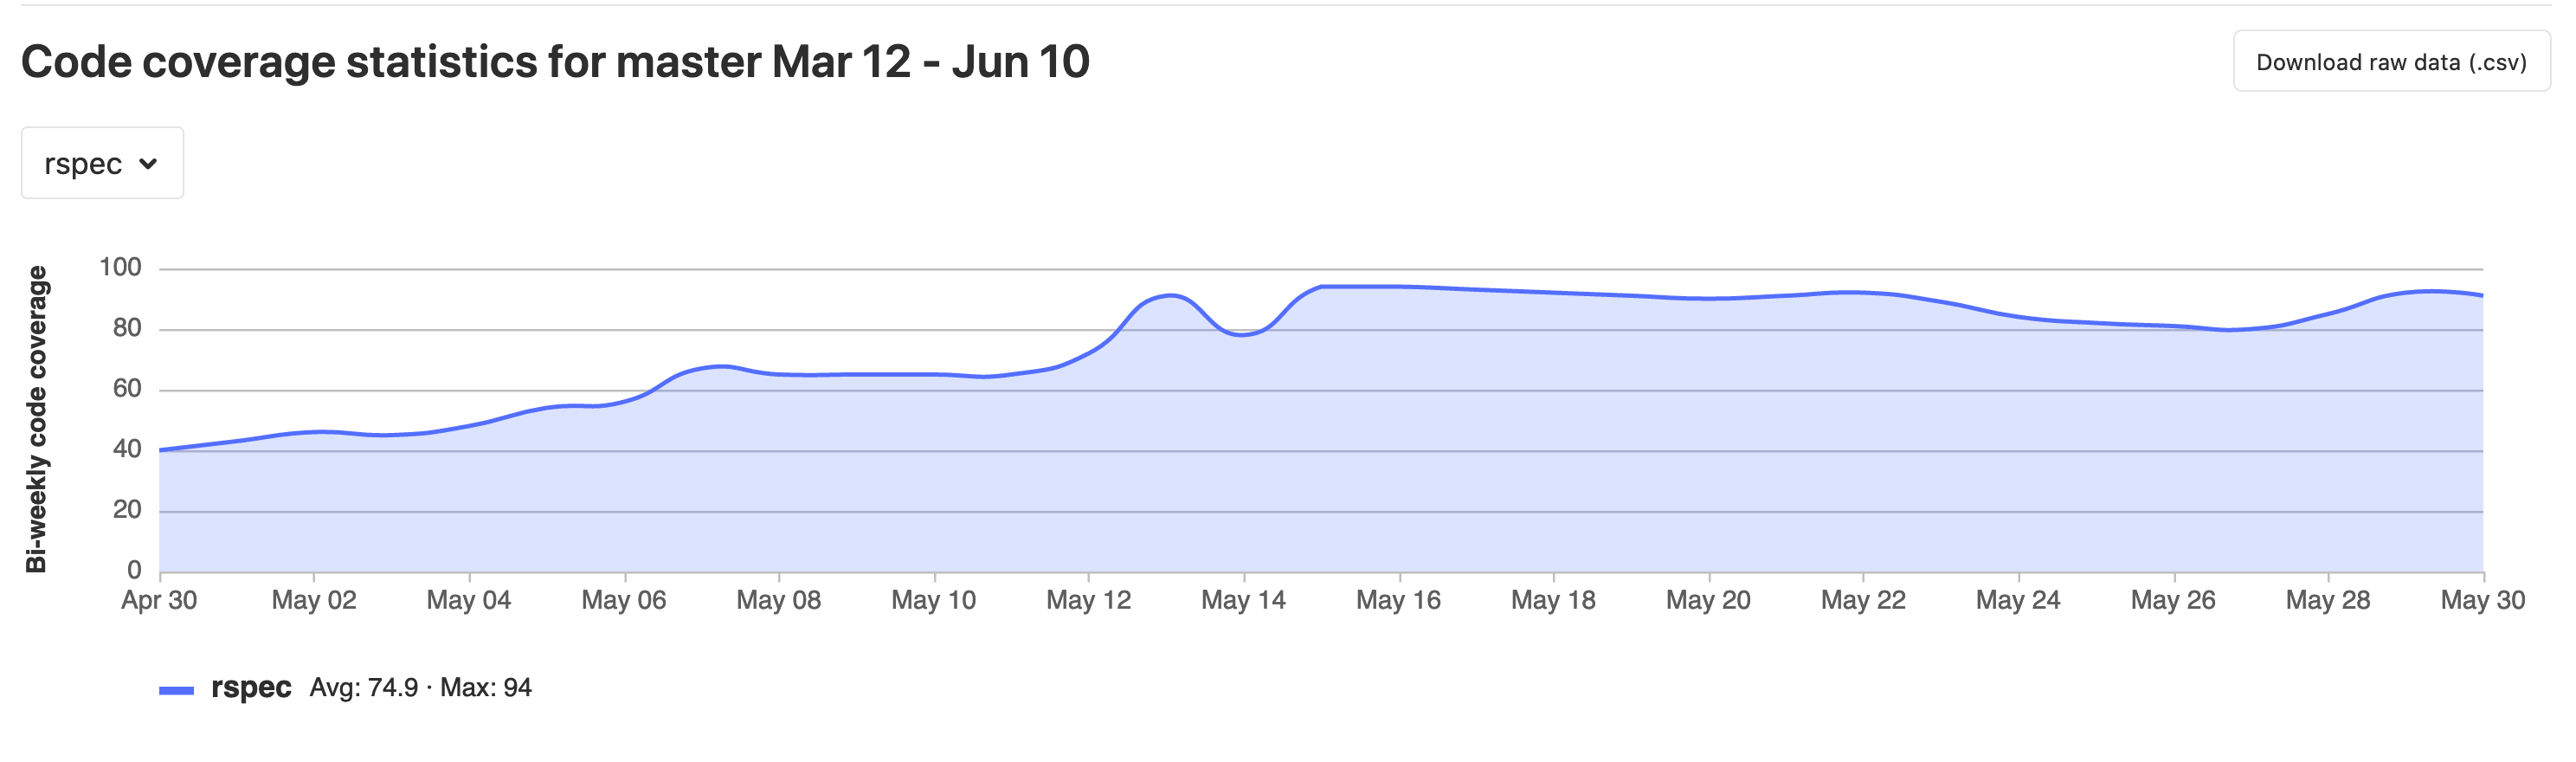
Code coverage history
- Introduced the ability to download a
.csvin GitLab 12.10.- Graph introduced in GitLab 13.1.
To see the evolution of your project code coverage over time, you can view a graph or download a CSV file with this data. From your project:
- Go to Project Analytics > Repository to see the historic data for each job listed in the dropdown above the graph.
- If you want a CSV file of that data, click Download raw data (
.csv)
Code coverage data is also available at the group level.
Removing color codes
Some test coverage tools output with ANSI color codes that aren't parsed correctly by the regular expression. This causes coverage parsing to fail.
Some coverage tools don't provide an option to disable color codes in the output. If so, pipe the output of the coverage tool through a small one line script that strips the color codes off.
For example:
lein cloverage | perl -pe 's/\e\[?.*?[\@-~]//g'
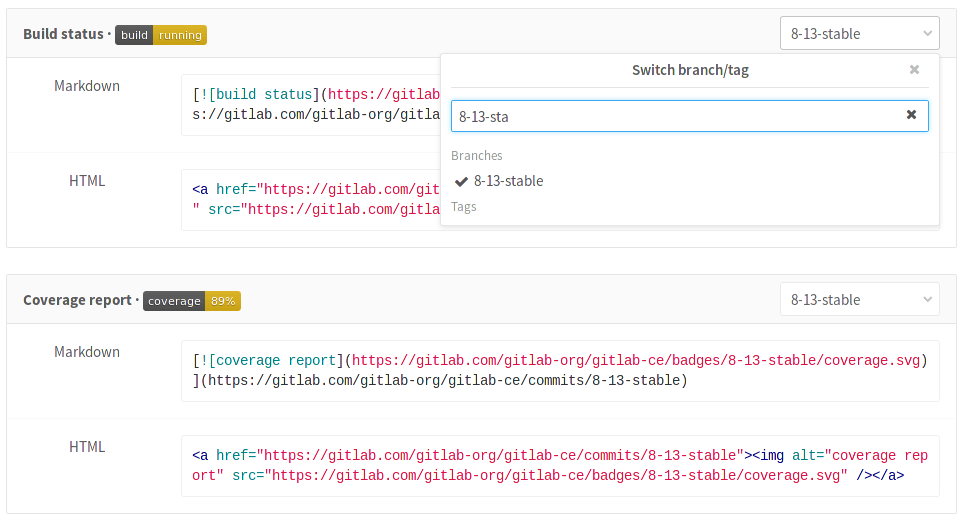
Pipeline badges
In the pipelines settings page you can find pipeline status and test coverage badges for your project. The latest successful pipeline is used to read the pipeline status and test coverage values.
Visit the pipelines settings page in your project to see the exact link to your badges. You can also see ways to embed the badge image in your HTML or Markdown pages.
Pipeline status badge
Depending on the status of your pipeline, a badge can have the following values:
pendingrunningpassedfailedskippedcanceledunknown
You can access a pipeline status badge image using the following link:
https://gitlab.example.com/<namespace>/<project>/badges/<branch>/pipeline.svg
Display only non-skipped status
If you want the pipeline status badge to only display the last non-skipped status, you can use the ?ignore_skipped=true query parameter:
https://gitlab.example.com/<namespace>/<project>/badges/<branch>/pipeline.svg?ignore_skipped=true
Test coverage report badge
GitLab makes it possible to define the regular expression for the coverage report, that each job log is matched against. This means that each job in the pipeline can have the test coverage percentage value defined.
The test coverage badge can be accessed using following link:
https://gitlab.example.com/<namespace>/<project>/badges/<branch>/coverage.svg
If you would like to get the coverage report from a specific job, you can add
the job=coverage_job_name parameter to the URL. For example, the following
Markdown code embeds the test coverage report badge of the coverage job
into your README.md:

Badge styles
Pipeline badges can be rendered in different styles by adding the style=style_name parameter to the URL. Two styles are available:
-
Flat (default):
https://gitlab.example.com/<namespace>/<project>/badges/<branch>/coverage.svg?style=flat
-
Flat square (Introduced in GitLab 11.8):
https://gitlab.example.com/<namespace>/<project>/badges/<branch>/coverage.svg?style=flat-square
Custom badge text
Introduced in GitLab 13.1.
The text for a badge can be customized to differentiate between multiple coverage jobs that run in the same pipeline. Customize the badge text and width by adding the key_text=custom_text and key_width=custom_key_width parameters to the URL:
https://gitlab.com/gitlab-org/gitlab/badges/main/coverage.svg?job=karma&key_text=Frontend+Coverage&key_width=130
