30 KiB
| type | stage | group | info |
|---|---|---|---|
| reference, howto | Manage | Access | To determine the technical writer assigned to the Stage/Group associated with this page, see https://about.gitlab.com/handbook/engineering/ux/technical-writing/#designated-technical-writers |
SAML SSO for GitLab.com groups (SILVER ONLY)
Introduced in GitLab.com Silver 11.0.
SAML on GitLab.com allows users to be added to a group. Those users can then sign in to GitLab.com. If such users don't already have an account on the GitLab instance, they can create one when signing in for the first time.
If you follow our guidance to automate user provisioning using SCIM or group-managed accounts, you do not need to create such accounts manually.
User synchronization for GitLab.com is partially supported using SCIM.
Important notes
Note the following:
- This topic is for SAML on GitLab.com Silver tier and above. For SAML on self-managed GitLab instances, see SAML OmniAuth Provider.
- SAML SSO for GitLab.com groups requires SCIM to sync users between providers. If a group is not using SCIM, group Owners will still need to manage user accounts (for example, removing users when necessary).
Configuring your Identity Provider
- Navigate to the group and click Settings > SAML SSO.
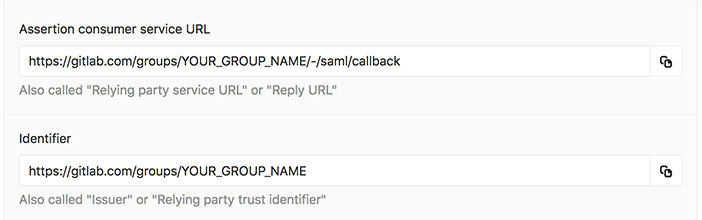
- Configure your SAML server using the Assertion consumer service URL and Identifier. Alternatively GitLab provides metadata XML configuration. See your identity provider's documentation for more details.
- Configure the SAML response to include a NameID that uniquely identifies each user.
- Configure required assertions using the table below.
- Once the identity provider is set up, move on to configuring GitLab.
NameID
GitLab.com uses the SAML NameID to identify users. The NameID element:
- Is a required field in the SAML response.
- Must be unique to each user.
- Must be a persistent value that will never change, such as a randomly generated unique user ID.
- Is case sensitive. The NameID must match exactly on subsequent login attempts, so should not rely on user input that could change between upper and lower case.
- Should not be an email address or username. We strongly recommend against these as it is hard to guarantee they will never change, for example when a person's name changes. Email addresses are also case-insensitive, which can result in users being unable to sign in.
The relevant field name and recommended value for supported providers are in the provider specific notes. appropriate corresponding field.
CAUTION: Warning:
Once users have signed into GitLab using the SSO SAML setup, changing the NameID will break the configuration and potentially lock users out of the GitLab group.
NameID Format
We recommend setting the NameID format to Persistent unless using a field (such as email) that requires a different format.
SSO enforcement
- Introduced in GitLab 11.8.
- Improved in GitLab 11.11 with ongoing enforcement in the GitLab UI.
With this option enabled, users must use your group's GitLab single sign on URL to be added to the group or be added via SCIM. Users cannot be added manually, and may only access project/group resources via the UI by signing in through the SSO URL.
However, users will not be prompted to log via SSO on each visit. GitLab will check whether a user has authenticated through the SSO link, and will only prompt the user to login via SSO if the session has expired.
We intend to add a similar SSO requirement for Git and API activity in the future.
When SSO enforcement is enabled for a group, users cannot share a project in the group outside the top-level group, even if the project is forked.
Group-managed accounts
Introduced in GitLab 12.1.
When SSO is being enforced, groups can enable an additional level of protection by enforcing the creation of dedicated user accounts to access the group.
Without group-managed accounts, users can link their SAML identity with any existing user on the instance. With group-managed accounts enabled, users are required to create a new, dedicated user linked to the group. The notification email address associated with the user is locked to the email address received from the configured identity provider.
When this option is enabled:
- All existing and new users in the group will be required to log in via the SSO URL associated with the group.
- After the group-managed account has been created, group activity will require the use of this user account.
- Users can't share a project in the group outside the top-level group (also applies to forked projects).
Upon successful authentication, GitLab prompts the user with options, based on the email address received from the configured identity provider:
- To create a unique account with the newly received email address.
- If the received email address matches one of the user's verified GitLab email addresses, the option to convert the existing account to a group-managed account. (Introduced in GitLab 12.9.)
Since use of the group-managed account requires the use of SSO, users of group-managed accounts will lose access to these accounts when they are no longer able to authenticate with the connected identity provider. In the case of an offboarded employee who has been removed from your identity provider:
- The user will be unable to access the group (their credentials will no longer work on the identity provider when prompted to SSO).
- Contributions in the group (e.g. issues, merge requests) will remain intact.
Feature flag
Currently the group-managed accounts feature is behind a feature flag: group_managed_accounts. The flag is disabled by default.
To activate the feature, ask a GitLab administrator with Rails console access to run:
Feature.enable(:group_managed_accounts)
Credentials inventory for Group-managed accounts (ULTIMATE)
Introduced in GitLab 12.8.
Owners who manage user accounts in a group can view the following details of personal access tokens and SSH keys:
- Owners
- Scopes
- Usage patterns
To access the Credentials inventory of a group, navigate to {shield} Security & Compliance > Credentials in your group's sidebar.
This feature is similar to the Credentials inventory for self-managed instances.
Limiting lifetime of personal access tokens of users in Group-managed accounts (ULTIMATE)
Introduced in GitLab 12.10.
Users in a group managed account can optionally specify an expiration date for personal access tokens. This expiration date is not a requirement, and can be set to any arbitrary date.
Since personal access tokens are the only token needed for programmatic access to GitLab, organizations with security requirements may want to enforce more protection to require regular rotation of these tokens.
Setting a limit
Only a GitLab administrator or an owner of a Group-managed account can set a limit. Leaving it empty means that the instance level restrictions on the lifetime of personal access tokens will apply.
To set a limit on how long personal access tokens are valid for users in a group managed account:
- Navigate to the {settings} Settings > General page in your group's sidebar.
- Expand the Permissions, LFS, 2FA section.
- Fill in the Maximum allowable lifetime for personal access tokens (days) field.
- Click Save changes.
Once a lifetime for personal access tokens is set, GitLab will:
- Apply the lifetime for new personal access tokens, and require users managed by the group to set an expiration date that is no later than the allowed lifetime.
- After three hours, revoke old tokens with no expiration date or with a lifetime longer than the allowed lifetime. Three hours is given to allow administrators/group owner to change the allowed lifetime, or remove it, before revocation takes place.
Outer forks restriction for Group-managed accounts
Introduced in GitLab 12.9.
Groups with group-managed accounts can disallow forking of projects to destinations outside the group. To do so, enable the "Prohibit outer forks" option in Settings > SAML SSO. When enabled, projects within the group can only be forked to other destinations within the group (including its subgroups).
Other restrictions for Group-managed accounts
Introduced in GitLab 12.9.
Projects within groups with enabled group-managed accounts are not to be shared with:
- Groups outside of the parent group.
- Members who are not users managed by this group.
This restriction also applies to projects forked from or to those groups.
Assertions
When using group-managed accounts, the following user details need to be passed to GitLab as SAML assertions to be able to create a user.
| Field | Supported keys |
|---|---|
| Email (required) | email, mail |
| Full Name | name |
| First Name | first_name, firstname, firstName |
| Last Name | last_name, lastname, lastName |
Metadata configuration
GitLab provides metadata XML that can be used to configure your Identity Provider.
- Navigate to the group and click Settings > SAML SSO.
- Copy the provided GitLab metadata URL.
- Follow your Identity Provider's documentation and paste the metadata URL when it is requested.
Configuring GitLab
Once you've set up your identity provider to work with GitLab, you'll need to configure GitLab to use it for authentication:
- Navigate to the group's Settings > SAML SSO.
- Find the SSO URL from your Identity Provider and enter it the Identity provider single sign on URL field.
- Find and enter the fingerprint for the SAML token signing certificate in the Certificate field.
- Click the Enable SAML authentication for this group toggle switch.
- Click the Save changes button.
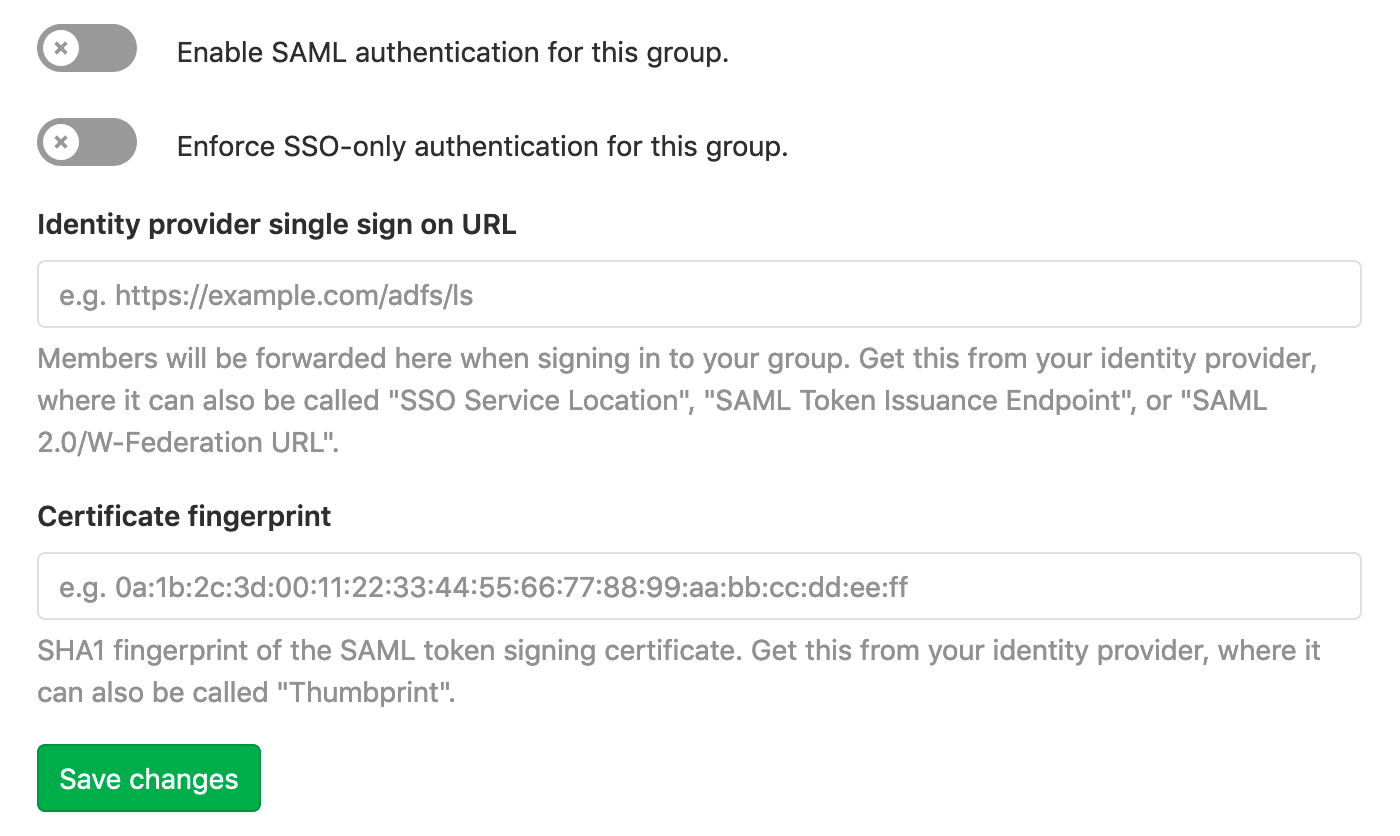
NOTE: Note: Please note that the certificate fingerprint algorithm must be in SHA1. When configuring the identity provider, use a secure signature algorithm.
User access and management
Once Group SSO is configured and enabled, users can access the GitLab.com group through the identity provider's dashboard. If SCIM is configured, please see the user access and linking setup section on the SCIM page.
When a user tries to sign in with Group SSO, they'll need an account that's configured with one of the following:
- SCIM.
- Group-managed accounts.
- A GitLab.com account.
- Click on the GitLab app in the identity provider's dashboard, or visit the Group's GitLab SSO URL.
- Sign in to GitLab.com. The next time you connect on the same browser, you won't have to sign in again provided the active session has not expired.
- Click on the Authorize button.
On subsequent visits, users can access the group through the identify provider's dashboard or by visiting links directly. With the enforce SSO option turned on, users will be redirected to log in through the identity provider as required.
Role
Upon first sign in, a new user is added to the parent group with the Guest role. Existing members with an appropriate role will have to elevate users to a higher role where relevant.
If a user is already a member of the group, linking the SAML identity does not change their role.
Blocking access
To rescind access to the group:
- Remove the user from the identity provider or users list for the specific app.
- Remove the user from the GitLab.com group.
Even when enforce SSO is active, we recommend removing the user from the group. Otherwise, the user can sign in through the identity provider if they do not have an active session.
Providers
NOTE: Note: GitLab is unable to provide support for IdPs that are not listed here.
| Provider | Documentation |
|---|---|
| ADFS (Active Directory Federation Services) | Create a Relying Party Trust |
| Azure | Configuring single sign-on to applications |
| Okta | Setting up a SAML application in Okta |
| OneLogin | Use the OneLogin SAML Test Connector |
When configuring your identify provider, please consider the notes below for specific providers to help avoid common issues and as a guide for terminology used.
Azure setup notes
For a demo of the Azure SAML setup including SCIM, see SCIM Provisioning on Azure Using SAML SSO for Groups Demo.
| GitLab Setting | Azure Field |
|---|---|
| Identifier | Identifier (Entity ID) |
| Assertion consumer service URL | Reply URL (Assertion Consumer Service URL) |
| Identity provider single sign on URL | Sign on URL |
| Certificate fingerprint | Thumbprint |
We recommend:
- Unique User Identifier (Name identifier) set to
user.objectID. - nameid-format set to persistent.
Set other user attributes and claims according to the assertions table.
Okta setup notes
For a demo of the Okta SAML setup including SCIM, see Demo: Okta Group SAML & SCIM setup.
| GitLab Setting | Okta Field |
|---|---|
| Identifier | Audience URI |
| Assertion consumer service URL | Single sign on URL |
Under Okta's Single sign on URL field, check the option Use this for Recipient URL and Destination URL.
Please note that Okta's generic SAML app does not have a Login URL field, where the Identity provider single sign on URL would normally go. The Identity provider single sign on URL may be required the first time a user is logging in if they are having any difficulties.
We recommend:
- Application username (NameID) set to Custom
user.getInternalProperty("id"). - Name ID Format set to Persistent.
Set attribute statements according to the assertions table.
OneLogin setup notes
The GitLab app listed in the OneLogin app catalog is for self-managed GitLab instances. For GitLab.com, use a generic SAML Test Connector such as the SAML Test Connector (Advanced).
| GitLab Setting | OneLogin Field |
|---|---|
| Identifier | Audience |
| Assertion consumer service URL | Recipient |
| Assertion consumer service URL | ACS (Consumer) URL |
| Assertion consumer service URL (escaped version) | ACS (Consumer) URL Validator |
| GitLab single sign on URL | Login URL |
Recommended NameID value: OneLogin ID.
Set parameters according to the assertions table.
Additional setup options
GitLab isn't limited to the SAML providers listed above but your Identity Provider may require additional configuration, such as the following:
| Field | Value | Notes |
|---|---|---|
| SAML Profile | Web browser SSO profile | GitLab uses SAML to sign users in via their browser. We don't make requests direct to the Identity Provider. |
| SAML Request Binding | HTTP Redirect | GitLab (the service provider) redirects users to your Identity Provider with a base64 encoded SAMLRequest HTTP parameter. |
| SAML Response Binding | HTTP POST | Your Identity Provider responds to users with an HTTP form including the SAMLResponse, which a user's browser submits back to GitLab. |
| Sign SAML Response | Yes | We require this to prevent tampering. |
| X.509 Certificate in response | Yes | This is used to sign the response and checked against the provided fingerprint. |
| Fingerprint Algorithm | SHA-1 | We need a SHA-1 hash of the certificate used to sign the SAML Response. |
| Signature Algorithm | SHA-1/SHA-256/SHA-384/SHA-512 | Also known as the Digest Method, this can be specified in the SAML response. It determines how a response is signed. |
| Encrypt SAML Assertion | No | TLS is used between your Identity Provider, the user's browser, and GitLab. |
| Sign SAML Assertion | Optional | We don't require Assertions to be signed. We validate their integrity by requiring the whole response to be signed. |
| Check SAML Request Signature | No | GitLab does not sign SAML requests, but does check the signature on the SAML response. |
| Default RelayState | Optional | The URL users should end up on after signing in via a button on your Identity Provider. |
| NameID Format | Persistent |
See details above. |
| Additional URLs | You may need to use the Identifier or Assertion consumer service URL in other fields on some providers. |
|
| Single Sign Out URL | Not supported |
If the information you need isn't listed above you may wish to check our troubleshooting docs below.
Linking SAML to your existing GitLab.com account
To link SAML to your existing GitLab.com account:
- Sign in to your GitLab.com account.
- Locate the SSO URL for the group you are signing in to. A group Admin can find this on the group's Settings > SAML SSO page.
- Visit the SSO URL and click Authorize.
- Enter your credentials on the Identity Provider if prompted.
- You will be redirected back to GitLab.com and should now have access to the group. In the future, you can use SAML to sign in to GitLab.com.
Signing in to GitLab.com with SAML
- Locate the SSO URL for the group you are signing in to. A group Admin can find this on a group's Settings > SAML SSO page. If configured, it might also be possible to sign in to GitLab starting from your Identity Provider.
- Visit the SSO URL and click the Sign in with Single Sign-On button.
- Enter your credentials on the Identity Provider if prompted.
- You will be signed in to GitLab.com and redirected to the group.
Unlinking accounts
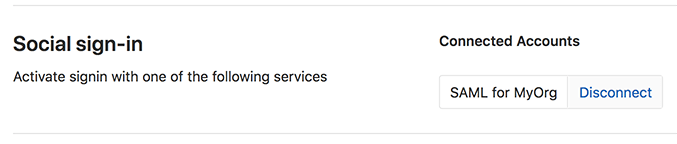
Users can unlink SAML for a group from their profile page. This can be helpful if:
- You no longer want a group to be able to sign you in to GitLab.com.
- Your SAML NameID has changed and so GitLab can no longer find your user.
For example, to unlink the MyOrg account, the following Disconnect button will be available under Profile > Accounts:
Glossary
| Term | Description |
|---|---|
| Identity Provider | The service which manages your user identities such as ADFS, Okta, Onelogin, or Ping Identity. |
| Service Provider | SAML considers GitLab to be a service provider. |
| Assertion | A piece of information about a user's identity, such as their name or role. Also know as claims or attributes. |
| SSO | Single Sign On. |
| Assertion consumer service URL | The callback on GitLab where users will be redirected after successfully authenticating with the identity provider. |
| Issuer | How GitLab identifies itself to the identity provider. Also known as a "Relying party trust identifier". |
| Certificate fingerprint | Used to confirm that communications over SAML are secure by checking that the server is signing communications with the correct certificate. Also known as a certificate thumbprint. |
Configuring on a self-managed GitLab instance
For self-managed GitLab instances we strongly recommend using the instance-wide SAML OmniAuth Provider instead.
Group SAML SSO helps if you need to allow access via multiple SAML identity providers, but as a multi-tenant solution is less suited to cases where you administer your own GitLab instance.
To proceed with configuring Group SAML SSO instead, you'll need to enable the group_saml OmniAuth provider. This can be done from:
gitlab.rbfor GitLab Omnibus installations.gitlab/config/gitlab.ymlfor source installations.
Limitations
Group SAML on a self-managed instance is limited when compared to the recommended instance-wide SAML. The recommended solution allows you to take advantage of:
Omnibus installations
-
Make sure GitLab is configured with HTTPS.
-
Enable OmniAuth and the
group_samlprovider ingitlab.rb:gitlab_rails['omniauth_enabled'] = true gitlab_rails['omniauth_providers'] = [{ name: 'group_saml' }]
Source installations
-
Make sure GitLab is configured with HTTPS.
-
Enable OmniAuth and the
group_samlprovider ingitlab/config/gitlab.yml:omniauth: enabled: true providers: - { name: 'group_saml' }
Troubleshooting
This section contains possible solutions for problems you might encounter.
SAML debugging tools
SAML responses are base64 encoded, so we recommend the following browser plugins to decode them on the fly:
Specific attention should be paid to:
- The NameID, which we use to identify which user is signing in. If the user has previously signed in, this must match the value we have stored.
- The presence of a
X509Certificate, which we require to verify the response signature. - The
SubjectConfirmationandConditions, which can cause errors if misconfigured.
Verifying configuration
For convenience, we've included some example resources used by our Support Team. While they may help you verify the SAML app configuration, they are not guaranteed to reflect the current state of third-party products.
Verifying NameID
In troubleshooting the Group SAML setup, any authenticated user can use the API to verify the NameID GitLab already has linked to the user by visiting https://gitlab.com/api/v4/user and checking the extern_uid under identities.
Similarly, group members of a role with the appropriate permissions can make use of the members API to view group SAML identity information for members of the group.
This can then be compared to the NameID being sent by the Identity Provider by decoding the message with a SAML debugging tool. We require that these match in order to identify users.
Message: "SAML authentication failed: Extern uid has already been taken"
This error suggests you are signed in as a GitLab user but have already linked your SAML identity to a different GitLab user. Sign out and then try to sign in again using the SSO SAML link, which should log you into GitLab with the linked user account.
If you do not wish to use that GitLab user with the SAML login, you can unlink the GitLab account from the group's SAML.
Message: "SAML authentication failed: User has already been taken"
The user that you're signed in with already has SAML linked to a different identity. Here are possible causes and solutions:
| Cause | Solution |
|---|---|
| You've tried to link multiple SAML identities to the same user, for a given Identity Provider. | Change the identity that you sign in with. To do so, unlink the previous SAML identity from this GitLab account before attempting to sign in again. |
| The Identity Provider might be returning an inconsistent NameID. | Ask an admin of your Identity Provider to use the SCIM API to update your extern_uid to match the current NameID. |
Message: "SAML authentication failed: Email has already been taken"
| Cause | Solution |
|---|---|
| When a user account with the email address already exists in GitLab, but the user does not have the SAML identity tied to their account. | The user will need to link their account. |
Message: "SAML authentication failed: Extern uid has already been taken, User has already been taken"
Getting both of these errors at the same time suggests the NameID capitalization provided by the Identity Provider didn't exactly match the previous value for that user.
This can be prevented by configuring the NameID to return a consistent value. Fixing this for an individual user involves unlinking SAML in the GitLab account, although this will cause group membership and Todos to be lost.
The NameID has changed
| Cause | Solution |
|---|---|
| As mentioned in the NameID section, if the NameID changes for any user, the user can be locked out. This is a common problem when an email address is used as the identifier. | Follow the steps outlined in the "SAML authentication failed: User has already been taken" section. If many users are affected, we recommend that you use the appropriate API. |
I need to change my SAML app
Users will need to unlink the current SAML identity and link their identity to the new SAML app.
My identity provider isn't listed
Not a problem, the SAML standard means that a wide range of identity providers will work with GitLab. Unfortunately we aren't familiar with all of them so can only offer support configuring the listed providers.
Your identity provider may also have relevant documentation. It may be generic SAML documentation, or specifically targeted for GitLab. Examples:
I need additional information to configure my identity provider
Many SAML terms can vary between providers. It is possible that the information you are looking for is listed under another name.
For more information, start with your Identity Provider's documentation. Look for their options and examples to see how they configure SAML. This can provide hints on what you'll need to configure GitLab to work with these providers.
It can also help to look at our more detailed docs for self-managed GitLab.
SAML configuration for GitLab.com is mostly the same as for self-managed instances.
However, self-managed GitLab instances use a configuration file that supports more options as described in the external OmniAuth SAML documentation.
Internally that uses the ruby-saml library, so we sometimes check there to verify low level details of less commonly used options.
It can also help to compare the XML response from your provider with our example XML used for internal testing.